Grid Expert Advisor
System Overview
Introduction
Grid trading is when orders are placed above and below a set price, creating a grid of orders at incrementally increasing and decreasing prices. An advantage of grid trading is that it requires little forecasting of market direction and can be easily automated. Major drawbacks, however, are the possibility of incurring large losses associated with running and/or closing multiple positions in a large grid. Our grid “Hedge Zone” implementation provides a theoretically lossless grid trading system, under certain conditions, and practically lossless if operated correctly.
The alphaheim Grid EA implements a bi-directional (or dual grid) system, to have both a long and short exposure at every grid level. For this reason, this EA is not FIFO compliant, and would not be suitable for US clients.
Our grid system has been designed with account growth in mind. There are no static definitions of lot sizes, not profit targets, and are calculated within the EA for a convenient trading system.
We have implemented this system with complete stealth. There are no limit orders, and no stop loss/take profit levels.
Inputs
EA Magic Number
- Each trade associated with the current instance of the EA will have this unique number associated with it.
Base Timeframe
- When utilising Dynamic grid sizing (i.e. when Use Fixed Grid = False), the candles used to form the grid range will conform to this selected timeframe.
Augmented AB (%)
- Augmented Account Balance
- A drawback of a grid trading system is relatively high drawdowns.
- This set percentage will augment how much of the available balance/equity should be allocated to an individual grid.
- This will lower overall account drawdown and allow for multiple grids on the same account.
Position Size Method
- Determines the base lot size, for a regular grid level trade.
- When set to Fixed, the Lot Size (Fixed) input will be utilised.
- When set to Dynamic Balance Risk, the Balance Risk % (Base/Trade) input will be utilised.
Balance Risk % (Base/Trade)
- This will determine the lot size for a specified trade.
- This is not the total risk for a given grid.
- For a given grid level, the EA will look at the distance between subsequent levels, and calculate the lot size, such that a position with a SL of said distance, would lose the risk %.
Dynamic Targets
- Statistical methods often require that EAs seek profit targets with reference to the initial starting balance, rather than the current account balance.
- When set to true, any target, e.g. TP, SL, will be based upon the current account balance, at the time of grid formation.
- When set to false, targets will be based upon the initial account balance, and will not grow/recede with the current account balance.
Account TP %
- Upon initialisation of a grid, the EA will evaluate a profit target. Given the Augmented AB, the grid will seek a net profit of this percentage, inclusive of all commission and swap costs.
Max Number of TPs
- After the EA has successfully logged a profit x times, the EA will be removed from the chart, and will seize to function until manually reloaded.
- To disable, set to 0.
Max Grid Loss TP Multiple
- If the current loss for a given grid, exceeds the negative multiple of the TP target, all trades will be closed, and a new grid will be formed.
- To disable, set to 0.
Receive TP Notification (Mobile)
- Enables push notifications to your mobile device for key grid metrics.
- For this feature to operate, you must have the MetaTrader mobile app installed on your device, and you must enter the device’s MetaQuotes ID into the main MetaTrader terminal, under Tools→Options→Notifications.
Use Fixed Grid
- If set to true, the grid will be created according to the defined fixed grid criteria.
- If set to false, the grid will be dynamically created using either number of candles, or time-based ranges.
Fixed Grid Range (Pips)
- For a fixed grid setup, this will define the range of the grid, from the top to the bottom.
Fixed Grid Step (Pips)
- For a fixed grid setup, the size of the gap between grid lines, in pips.
Rounded Fixed Grid
- For a fixed grid, if set to false, the center line for the grid will take the current bid price, with subsequent levels surrounding. If set to true, the current bid price will be rounded to match the grid step level.
Dynamic Range Period
- Assuming Use Fixed Grid = False, this input will determine how the grid range is formed.
- If set to 0, the range will be time based (Sessions), which are later defined.
- Otherwise, this input will be the number of candles for which the EA will look back, to determine the top and bottom of the trading range.
- For example, if set to 100, and the Base timeframe is set to 1 Hour, then the EA will calculate the range over the last 100 hours, at the point of grid creation.
Range Extension (Percentage)
- When utilising historical ranges, it is often the case that the market will respect the ranges, but extend a certain percentage, prior to ranging within the same period.
- When set, the candle/time-based range will be extended by the set percentage, around the center price.
- For example, when set to 200%, the grid will extend the range top by 100%, from the central line, and the range bottom by 100%, from the central line.
Number of Grid Lines
- After computing the grid’s trading range, the number of grid lines will be determined by this input. Subsequently, given the range of the grid, and the number of lines, the distance between grid lines will equal Grid Range / Number of Grid Lines.
Minimum/Maximum Grid Interval (Pips)
- If the dynamically created grid attempts to enforce spacing under the minimum threshold. Or above the maximum threshold, the grid will not be drawn, and trading will not take place.
Maximum Open Risk
- Our Open Risk calculation takes every trade currently open, and augments a stop loss, according to the grid boundaries, and either displays as a percentage of current account balance, or initial account balance.
- When set to 0, no trading restrictions will apply.
- Otherwise, when the current open risk exceeds the maximum, the EA will not open trades until open risk reduces. The closing of existing trades will operate as usual.
Use Shifting Grid
- Only suitable for grids with fixed step definitions.
- Utilising this feature will allow for an “Infinity Grid” implementation.
- As the price shift up/down, the grid will move in the corresponding direction.
- Typical bi-directional grid trading will occur within the lines.
- If the grid shifts beyond a level that has an open position, the position will be automatically closed.
Max Number of Trades
- For every individual grid, if the number of trades for that singular grid exceeds x, the grid will close as soon as the grid is in profit or broken even.
- To disable, set to 0.
Maximum Spread (Points)
- If the current spread for the symbol is greater than this ceiling value, then no trades will be permitted. If a grid line is crossed during a restricted period, favourable trades will be closed at a higher than intended profit. The skipped trade level will only be entered once it has been crossed again during an unrestricted period.
- To disable, set to 0.
Use Trend Handler
- This function will restrict long/short entries based upon the general market trend, determined by our Triangular Moving Average Indicator.
- If the indicator returns a trending market, with a long bias, only long positions will be permitted. Conversely, if the indicator returns a trending market, with a short bias, then only short positions will be permitted.
Use Momentum Handler
- This function will prevent additional positions, based upon the net number of positions in that direction.
- For example, if “Max Trade Imbalance (Momentum)” has been set to 3, and a grid currently has 4 longs and one short, as price continues to move down, long positions will no longer be permitted.
Use Momentum Trade Closer
- This function will close the most trailing trades, as soon as the “Max Trade Imbalance (Momentum)” has been met.
- For example, assume the price is moving up, whilst the “Max Trade Imbalance (Momentum)” has been set to 3, with 4 open short positions and 1 open long. As soon as the next higher grid line has been reached, the short position with the greatest distance from the current price will be closed at a loss.
Max Trade Imbalance (Momentum)
- The Imbalance (relevant difference between number of long and short positions) for the Momentum functions above.
Use Imbalance Multiplier
- Sometimes it is the case that a grid is formed, and trades occur, but then a trend develops. In this situation, you will have many trades against the current movement of price. This means that whilst you will indeed be closing profitable trades, the losses you are holding onto from previous trades get larger.
- One possible solution is to increase the position size of subsequent trades in the direction of the current trend. When the number of buys and sells currently in the grid differs by “Min Trade Imbalance (Imbalance)”, the new positions will have a modified size.
- If “Use Volume Multiplier” is set to true, the function will look at your net lot exposure in the incorrect direction. It will then multiply it by “Imbalance Lot Multiplier” to get the new position size.
- If, “Use Volume Multiplier” is set to false, the new position size will be the grid base lot size multiplied by “Imbalance Lot Multiplier”.
- This function operates well in trending conditions, but does indeed increase risk.
Imbalance Trend Check
- This function restricts the implementation of the Imbalance Multiplier.
- If set to true, the imbalance function will only operate if the TMA indicator also has a bias in the direction of the current intended trade.
Grid Breach Check
- This function will determine the EA’s behaviour once price has exited the pre-existing grid.
- If set to true, the EA will classify price as being outside of the grid, only when “Number of Candles Breached” successive candles have closed outside of the grid. The logic following a grid breach is described within the inputs below.
- If set to false, no trading will occur until the price retracts back within the grid, or manual intervention.
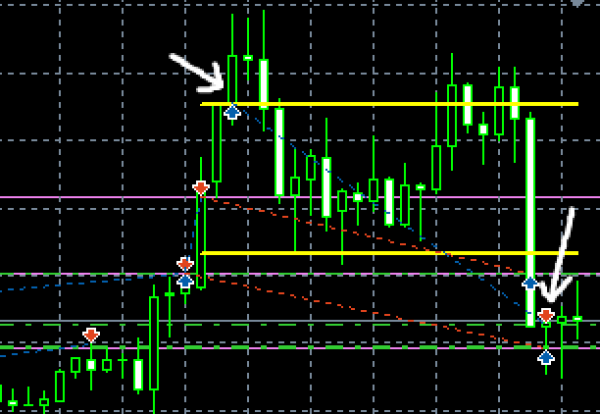
Hedge on Breach
- Once it has been determined that price is outside of the grid, a hedging procedure may proceed.
- If set to false, no hedging will occur. All trades will be closed, at a likely loss, and the grid will be reset.
- If set to true, a “hedging zone” will be created, based on the “Hedge ATR Multiplier” multiplier of the ATR, centralised around the closed candle. The hedge zone will have a top, named “zoneTop”, and a bottom, named “zoneBottom”.
- If price returns to the grid and closes within the grid for “Number of Candles Breached” successive candles, prior to placing any hedge trades, the hedging procedure is cancelled.
- If price continues toward the outermost zone level, a larger lot position will be placed. If “Use Closed Candle for Hedge Opening & Closing” is set to true, the price must first close outside of the zone level.
- The size of the position will depend on the “Hedge Pip Target”. The EA will evaluate all open positions, and calculate the lot size, such that the grid breaks even, and resets, when the hedge position reaches the “Hedge Pip Target”.
- If the target is not met, and price reaches the opposite zone level, the preceding hedge position will be closed, and a new position will be calculated and entered.
- This procedure will continue until the market moves in either direction, by the “Hedge Pip Target”.
- This implementation allows for the possibility of every grid formation to breakeven, provided sufficiently large lot sizes and suitable liquidity.
- The market will eventually move in either direction, but if price ranges within the hedge zone for an extended period of time, the losses will accumulate. This theoretically lossless implementation is transferred to practicality when combined with sensible augmentation of the account balance. Brokers also restrict maximum lot sizes by default. For the “Hedge Pip Target” to be accurate, the calculations should not be hindered.
- An illustration is provided below of two hedge positions. The initial long hedge did not meet the desired target, and was forced to close at a loss, followed by a short hedge position. The hedged short position did permit the grid to breakeven, and the grid routine continued as usual.
Use Range Grid Reset
- Whilst a grid is active, if a trend develops, and the TMA indicator no longer identifies a ranging market, the grid will close all trades and restart, irrespective of whether the grid is in a profit or loss.
Use Range Entry Limiter
- Before a grid can be formed, there is a check to see if the market is trending. If the TMA indicator identifies a ranging market (Purple histogram), the grid is formed. Otherwise, the EA will wait until the condition is met.
Server Open/Close Restrictions
- Time based entry and exit restrictions, based upon GMT time.
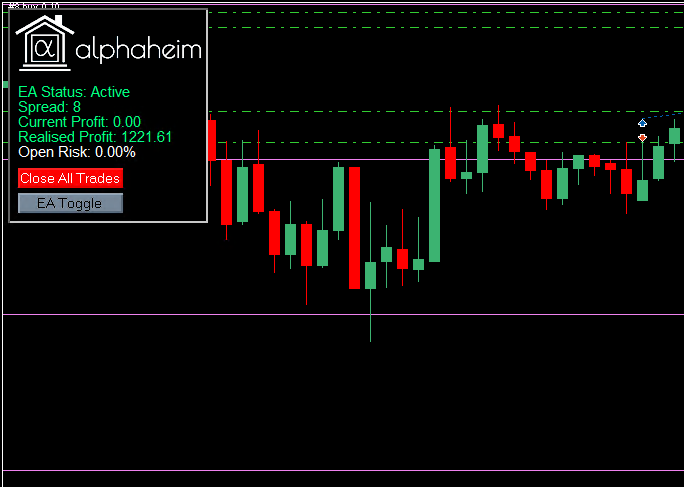
Show Close Trades / Suspend Buttons
- Enables the drawing of two buttons on the chart
- ”Close All Trades” – This will close all trades for the current grid and reset to form a new grid.
- ”EA Toggle” – This will temporarily pause the EA from trading, until manually reactivated using the same button.
Panel Pixel X/Y Shift
- If the information panel is incorrectly drawn, these inputs will help spread/restrict the drawing. It is a good starting point to use multiplies of 10 for both inputs.
Half Length
- Averaging period for the underlying TMA line.
Applied Price
- Input data for the underlying TMA calculations.
Deviation
- Standard Deviation from TMA line for formation of channel.
Min. Range (%)
- Ceiling percentage for a Ranging market classification.
Lookback Period
- Search period, from the current candle, to seek highest and lowest points of the channel.
Only trade sessions once
- When using session-based ranges, trading the same range multiple times may not be a wise idea, especially if the ranges do not cover a sufficiently large window.
- If set to true, once a grid has been closed, regardless of profit or loss, in a set session, a new grid cannot be traded until a new session is entered.
Use Session X
- Enables trading based upon the defined session times.
- All Session times are based upon GMT times.
Range Start [Session X]
- Our range calculation methodology is only precise to the given hour. Any inputs in the minutes/seconds fields will be ignored. Similarly, the Year field is also ignored.
- The Day inputted in the date field will reference the day index, for the start of the range, with 1 = Monday.
- The Month inputted in the date field, will reference how many weeks back the range start should be shifted, with a shift of one.
- Weekend overlaps are automatically calculated, and does not require any alteration of the Month field.
Range End [Session X]
- This input will decide the day and hour on which the session range will end, and be subsequently calculated upon.
Trading Zone (Hours) [Session X]
- A grid may be formed within this number of hours, after the Range End.
Zone End Delta (Hours) [Session X]
- When set to -1, a grid formed upon a session, will only close on manual closure, or meeting a predetermined SL/TP target.
- If set to 0, if there is an open grid at the end of the Trading Zone (Hours), then the grid will be closed, regardless of profit or loss.
- If set otherwise, the grid will be closed at the Trading Zone + Zone End Delta, regardless of profit or loss.
Session Setting Examples
- Monday 01 00 – Wednesday 12:00, whilst allowing the grid to trade the range for 24 hours, and no time-based exit.
- Range Start = 1990.01.01 01:00:00
- Range End = 1990.01.03 12:00:00
- Trading Zone = 24
- Zone End Delta = -1
- Friday 19 00 – Tuesday 06:00, whilst allowing the grid to trade the range for 12 hours, and strict exit at the end of the trading zone.
- Range Start = 1990.01.05 19:00:00
- Range End = 1990.01.02 06:00:00
- Trading Zone = 12
- Zone End Delta = 0
- Thursday 12:00 – Monday 03;00, shifting the range start by 2 weeks, whilst allowing the grid to trade the range for 72 hours, and strict exit at the end of the trading zone + 1 day.
- Range Start = 1990.03.04 12:00:00
- Range End = 1990.01.01 03:00:00
- Trading Zone = 72
- Zone End Delta = 24
Important Considerations
Grid Trading Considerations
The success of Grid Trading very much depends on the currency pair it is executed on. Trending markets are bad for grid strategies, and some currency pairs are more likely to trend than others. Typically, trending pairs are when there are large interest rate differentials between the currencies, for example, AUDJPY and NZDJPY.
For 2020, a current view of market volatility is provided below.

In addition to a currency pair’s likelihood of trending, it is important to take account its possible trading range. For example, AUDJPY highest high in the last 20 years was 107.83 and the lowest low was 54.92 –almost 5300 pips.
EA Considerations
Trade Tracking
Once an EA has been applied to a specific chart, for a specific timeframe, the EA will only continue for as long as the conditions remain. If the chart timeframe is changed altered when an EA is active, the EA will de-initialise, then reinitialize as if new. This will also occur if the EA settings are altered after it has already applied. If the EA has placed a trade, and any of the above occur, the EA will no longer track the trades that have been opened. This circumstance will extend where your VPS/machine restarts during an open grid.
Pip Denominations
- For simplicity, and workability across symbols, the definition of a pip has been simplified.
- For 5-Digit symbols, a pip is classified as 0.00010.
- For 3-Digit symbols, or less, a pip is defined as 0.010.
- Please take this into careful consideration when applying the EA to metals and equities.
- For example, applied to Gold, to have a grid line every $1.00, you would enter the pip value as 100.