This is an old revision of the document!
Getting Started
Virtual Private Server (VPS)
What is a VPS?
A virtual private server, also known as VPS, is a very powerful tool for Forex trading. It is a web hosting, which utilizes a data center to allow traders, various businesses and companies to trust their livelihood to a safer, more reliable, remote computer. With a direct ISP connection to their virtual private server, traders use better hardware to better control their trading operations, without any interruptions. Shared hosting allows to place a website or utilize a trading software on your VPS, while it also suffices the needs of other clients. A VPS provider charges the consumers a monthly fee for a virtual private server, this way covering the costs and expenses of the server. A VPS differs from shared hosting in that you do not share your designated resources with other users, because every individual receives a separate, partitioned part of the server with its storage, RAM, and an operating system. The cost of a virtual private can differ depending on the specifications offered.
Why do you need a VPS?
A VPS allows you to trade 24/7, without any interruptions, utilize a high-speed internet, and even completely automate your trades, by designing an algorithm, which reflects your trading strategy. You have access to your VPS from anywhere, as long as you have an internet connection. This incredible flexibility allows you to check and monitor your trades from any location. Because your virtual private server is in a different location, your automated trades will continue even during a power outage, which is the main flaw of a fully automated trading system based in your home. You can even completely separate yourself from technology, and your trades will continue to be executed. For more successful traders, the security of their trades is a major concern. A VPS has an extremely high level of security. Even the hardware of the server is constantly being checked to guarantee the highest level of functionality and security.
Which VPS provider and package to choose?
It is imperative to ensure you select the right VPS provider, for your specific broker. Take IC Markets, for example. IC Market trading servers are located in the Equinix NY4 data center, and thus, we must ensure our VPS is similarly located. In this particular case, fxvm.net offer a suitable VPS package, with an average latency of 2ms, a considerable improvement from the 120ms average on local machines.
FXVM Sign-Up Link: https://bestfxvps.com/
MetaTrader Helper
Placement of EAs, Indicators and Presets
If you wish to use externally sourced MetaTrader plugins, such as our own trading systems, please follow the steps below to ensure they are correctly located in the terminal’s directory.
From the main MetaTrader terminal, navigate to File→Open Data Folder→MQL4/MQL5.
EAs and Indicators will have an ex4/ex5 extension, and should then be placed in the “Experts” or “Indicators” folder.
Preconfigured setting files, with a set extension, should then be placed in the “Presets” folder.
Automated trading permission
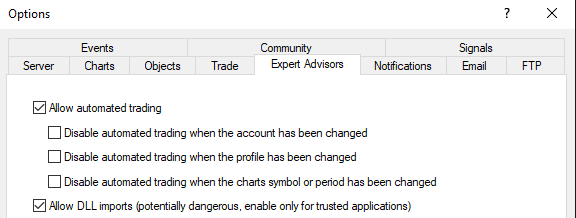
By default, MetaTrader will disable Experts from automated trading. This will prevent any of our EAs from placing any trades. To remedy this, navigate to Tools→ Options. Under the “Expert Advisors” tab, check the “Allow automated trading” box. The nested boxes are safety nets, enable/disable at your desire.
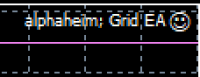
Upon loading an EA to a chart, there should be a visible “smiley” face on the top right of the chart, as indicated below. If the emoticon is frowning, please check the settings again.
Opening charts and applying EAs/Indicators/Presets
To the right of your terminal, you should see some currency pairs in various colours under the header of “Market Watch”. If this is not the case, navigate from the top toolbar View→Market Watch.
Then, right click on any currency pair, and click “Chart Window”.
Under the “Market Watch”, there should be a “Navigator” panel. If not navigate to View→Navigator. From within this panel, under “Expert Advisors” and “Indicators” you should see all of the available files. If you don’t see it, right click on something in the navigator panel, and hit “Refresh”.
To load a Preset, load the EA/Indicator, then switch to the “Inputs” tab. Click “Load”, and the Preset files should appear.
Back-testing
Access the Strategy Tester
The “Strategy Tester” is accessible by either hit CTRL+R, or navigating to View→Strategy Tester.
MetaTrader 4 Specific Issues
Insufficient Data
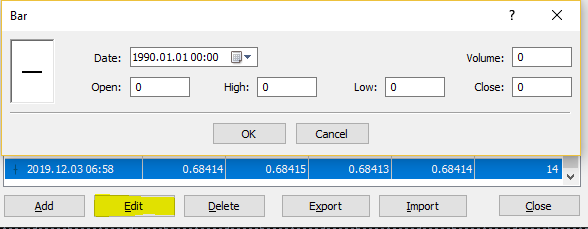
Upon an initial attempt at back-testing a system, you may have insufficient data to test over a given period. This data comes directly from your trading broker, and will vary according to each specific broker. In order to gain as much data as possible, navigate to Tools→History Center. Select a symbol to worth with, and open the “1 Minute” data. Scroll down to the last result, select the row, then hit “Edit”. Change the values as below, then hit “OK”. Click “Download”, then “Close”. Proceed to open the 1 Minute chart for the modified symbol, and scroll back as far as possible. This will then hopefully load as much data as possible from the broker server. Following this, revert back to the History Center and delete the false row modified earlier on.
Fixed Spread and Data Quality
The Strategy Tester in MT4, with its default configuration, is not sufficiently reliable. In order to produce the most accurate reports possible, it would be wise to test using a third party testing plug in, such as Tick Data Suite. TDS will be able to use accurate tick data, and also emulate the variable spread and slippage. Utilising TDS will also permit a wider data range for testing.
Installation Instructions
All of our products are authenticated through our server. In order for the product to be utilised, two steps must be followed to allow MetaTrader to perform the authentication steps.
Allow DLLs
The usage of DLLs must be permitted in order for the activation process to occur.
To allow DDLs, from the MetaTrader terminal, navigate to Tools→Options→Expert Advisors. From here, please check the “Allow DLL imports” box.
Installer
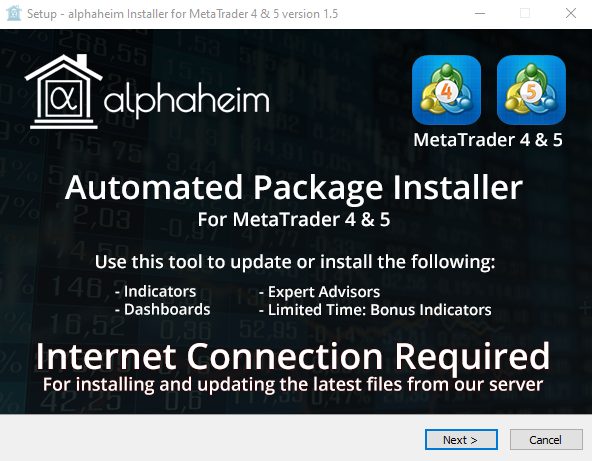
We have designed a user-friendly installer to automatically place all alphaheim indicators/experts in the designated folder. The installer can be found from your alphaheim account under “Downloads” for the purchased product.
Authentication
Most of our products require authentication for utilisation. In the case of an authorisation failure, the indicator/EA will fail to load, and display “Unregistered” on the chart.
In order to ensure your product is successfully authenticated, please ensure the following steps are followed.
DLLs have been allowed. Please refer to the prior section for assistance.
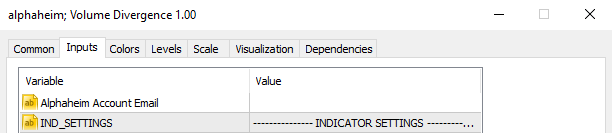
Your Alphaheim account email has been set in the indicator/EA inputs.
When loading our products on a chart, there will be an “Inputs” tab, identical to the image below. This field must be entered, and must have an active subscription.
The MetaTrader Account number matches the registered account number in the Alphaheim account portal.
When subscribing for a product, you must enter the account number for which the product will be used. Your MetaTrader account number will be displayed on the top left of the MetaTrader terminal. The account number stored on our site can be changed at any time using the steps below.
If you would like to view/change the Account number used for Alphaheim authentication, please follow the steps indicated in the images.
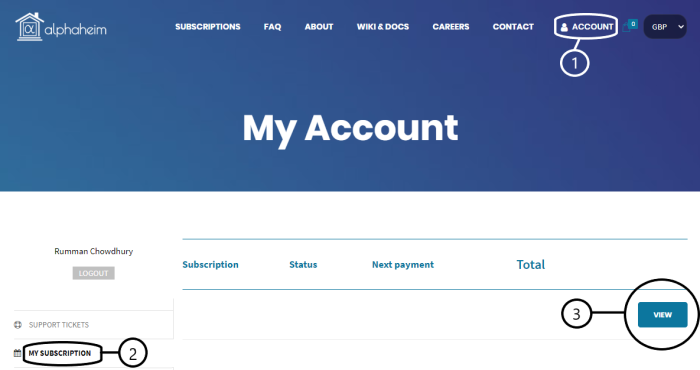
1) Click “Account” and ensure you are logged in.
2) Click “My Subscription”.
3) Click “View” for the subscription to would like to amend. For the purpose of this image, the subscription details have been obscured.
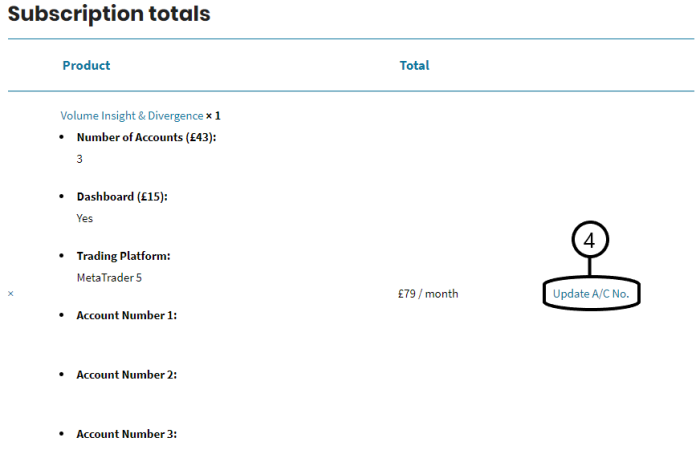
4) Once the detailed subscription page loads, scroll down and click the “Update A/C No.” link.
5) View / Update the MetaTrader Account number used for our authentication method.